140‐Day QuickBooks Trial Software
Installation Guide
This guide will help you install the 140‐day trial version of QuickBooks that is associated with your textbook. Depending on your textbook, the software may be available via digital download or DVD. This guide includes instructions for installing the software using both methods. Also included are instructions for toggling to the Pro edition of the software, which is necessary for some users. Be sure to check out the Common Questions section at the end of this guide.
|
|
Contents |
|
|
|
| Note! Your QuickBooks trial software is intended for use on a Windows‐based PC. The | |
software cannot be installed mobile devices using the iOS or Android operating system. |
|
Please see this page for more information on system requirements to install QuickBooks. |
Installing QuickBooks – Digital Download
If your trial version of QuickBooks is provided via digital download, you will access the software from the Intuit website.
Before you get started, make sure you have your license number and product number handy.
15‐digit license number: ___ ___ ___ ___ – ___ ___ ___ ___ – ___ ___ ___ ___ – ___ ___ ___
6‐digit product number: (QuickBooks 2014) 602 – 834 (QuickBooks 2015) 503 – 154
1.Close all running programs, including antivirus programs.
Remember to restart your antivirus program(s) after the software installation is complete.
2.Open a web browser and navigate to http://quickbooks.com/download.
These instructions use Internet Explorer. Different web browsers may behave differently.
3.Click the QuickBooks Accountant link for your version of QuickBooks.
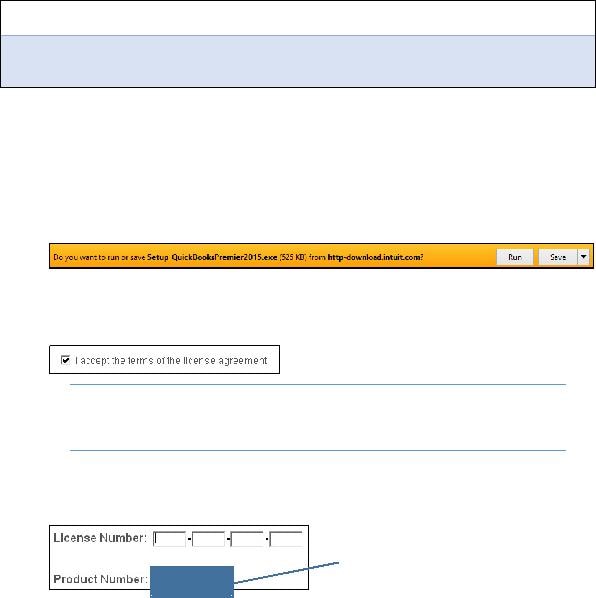
4.Choose the Run option in the download bar, and then choose Yes in the dialog box that appears.
Continue with the next step after the download completes.
5.Click Next in the wizard screen, and then click Next in the Intuit QuickBooks Installer window.
6.Click the checkbox to accept the terms of the license agreement; click Next.
Tip! If desired, use the Print link at the top‐right corner
of the window to print the License Agreement for your records.
7.Ensure that the Express (recommended) installation type is selected; click Next.
The Express installation will place QuickBooks in the default location on your computer.
8.Type your license number and product number in the provided boxes; click Next.
For QuickBooks 2014, use 602‐834.
For QuickBooks 2015, use 503‐153.
9.Click Install.
The installation can take time, so be patient!
10.Click Open QuickBooks in the screen that appears after the installation is complete.
11.If a notice regarding how QuickBooks uses your Internet connection appears, click OK.
The QuickBooks trial software is now installed on your computer.
12.Toggle to the Pro edition of the software, if necessary for your course.
_verified_ — Goldcut Jk Series Driver Windows 7
The GoldCut JK Series driver on Windows 7 is a testament to the longevity of both the hardware and the operating system. With careful attention to driver signature enforcement, port configuration, and power management, users can achieve reliable communication between the computer and the vinyl cutter. However, this solution is best suited for offline, legacy environments. As Windows 7 fades from common use, JK Series owners must either accept the maintenance burden of an outdated OS or invest in modern alternatives. For now, the GoldCut JK Series remains a functional, budget-friendly tool for those willing to navigate the technical nuances of Windows 7.
The intersection of legacy hardware and operating systems presents a unique set of challenges for users who rely on specialized equipment. The GoldCut JK Series, a line of vinyl cutting plotters popular in sign-making and garment decoration, exemplifies this struggle. While modern machines have moved to Windows 10 or 11, many small businesses and hobbyists continue to use Windows 7 due to its stability, low resource consumption, and compatibility with older software like CorelDRAW X3 or SignMaster. However, successfully installing the GoldCut JK Series driver on Windows 7 is not a plug-and-play process; it requires a deliberate approach involving driver compatibility, port settings, and workarounds for Microsoft’s evolving driver signature policies. goldcut jk series driver windows 7
For a successful installation on Windows 7, the user must follow a disciplined process. First, temporarily. Windows 7 includes a security feature that blocks drivers without a valid digital signature. To bypass this, restart the computer and press F8 before Windows loads, then select “Disable Driver Signature Enforcement” from the advanced boot menu. Second, install the driver manually via the “Devices and Printers” panel, choosing “Add a local printer” and selecting the GoldCut.inf file from the downloaded driver package. Third, configure the correct port : for USB connections, GoldCut typically creates a virtual COM port (e.g., COM3). This can be verified in Device Manager under “Ports (COM & LPT).” Finally, within the cutting software, select the GoldCut JK Series driver and match the baud rate (usually 9600 or 38400) to the plotter’s internal setting. The GoldCut JK Series driver on Windows 7
The GoldCut JK Series driver on Windows 7 is a testament to the longevity of both the hardware and the operating system. With careful attention to driver signature enforcement, port configuration, and power management, users can achieve reliable communication between the computer and the vinyl cutter. However, this solution is best suited for offline, legacy environments. As Windows 7 fades from common use, JK Series owners must either accept the maintenance burden of an outdated OS or invest in modern alternatives. For now, the GoldCut JK Series remains a functional, budget-friendly tool for those willing to navigate the technical nuances of Windows 7.
The intersection of legacy hardware and operating systems presents a unique set of challenges for users who rely on specialized equipment. The GoldCut JK Series, a line of vinyl cutting plotters popular in sign-making and garment decoration, exemplifies this struggle. While modern machines have moved to Windows 10 or 11, many small businesses and hobbyists continue to use Windows 7 due to its stability, low resource consumption, and compatibility with older software like CorelDRAW X3 or SignMaster. However, successfully installing the GoldCut JK Series driver on Windows 7 is not a plug-and-play process; it requires a deliberate approach involving driver compatibility, port settings, and workarounds for Microsoft’s evolving driver signature policies.
For a successful installation on Windows 7, the user must follow a disciplined process. First, temporarily. Windows 7 includes a security feature that blocks drivers without a valid digital signature. To bypass this, restart the computer and press F8 before Windows loads, then select “Disable Driver Signature Enforcement” from the advanced boot menu. Second, install the driver manually via the “Devices and Printers” panel, choosing “Add a local printer” and selecting the GoldCut.inf file from the downloaded driver package. Third, configure the correct port : for USB connections, GoldCut typically creates a virtual COM port (e.g., COM3). This can be verified in Device Manager under “Ports (COM & LPT).” Finally, within the cutting software, select the GoldCut JK Series driver and match the baud rate (usually 9600 or 38400) to the plotter’s internal setting.